I am not an okonomiyaki snob. But coming from Osaka, I have a lot to say about okonomiyaki. I still hold an okonomiyaki grudge against a friend from about 3 years ago. I have another okonomiyaki related grudge against a person that I am even ashamed to voice. Apparently, okonomiyaki is important to me.
Okonomiyaki requires ingredients that are not really pantry staples. Mountain potato or mountain potato powder? Little fried tempura nuggets (tenkasu)? Aonori? Who would have a regular supply of those in the kitchen?
And those okonomiyaki mixes sold on the shelves of Japanese food stores? Don’t buy them. First, they are what Bisquick is to pancakes. Second, the sugars and whatever nutritious things in those mixes attract insects. If you have them lying around for an extended amount of time in room temperature, the chance is that you have a whole breeding farm on your hands.
So, after several years, I devised a simple, okonomiyaki recipe that is different, yet wonderfully tasty and can be made with ingredients that are easy to acquire.
I also realized that many North American home cooks have some advantages above the Japanese home cooks.
1. The ubiquity of cast iron cookware.
Cast iron cookware is quite rare in Japan, which is a shame considering that it’s probably one of the best materials to cook okonomiyaki on. A cast iron griddle is the ideal vessel for cooking a crisp yet light okonomiyaki.
2. Access to ingredients that are expensive in Japan.
While pork, squid, and shrimp are probably the most standard toppings for okonomiyaki, there are infinite variations. Among those non-conventional okonomiyaki are those that use ingredients in Western cooking, such as cheese and cured meat. However, supermarket quality cheese and bacon in Japan are of very, very sad quality. Bacon and cheese that are equivalent to generic supermarket brand quality in the US are very expensive in Japan, and not something you throw into a cabbage pancake. By using stuff like hormel bacon and Kroger cheese, you already get a Western themed okonomiyaki that’s much better than what you might get in Japan.
Anyway, you can make pretty good okonomiyaki in North America.
Okonomiyaki consists of three parts: the base (cabbage, flour), the toppings (pork belly, squid, shrimp, etc.) and the sauce.
The base:
Basic steps are:
1. mix the dry ingredients, then the dashi stock (or dashi granules with water)
2. Throw in the cabbage
3. Throw in an egg, and mix
Making a fluffy and light okonomiyaki relies on the use of grated mountain potatoes (yamaimo) to make them light and fluffy. However, mountain potatoes are hard to acquire, or are quite expensive. In order to compensate for the lack of mountain potatoes, I increase the amount of cabbage relative to the amount of flour, so that the okonomiyaki would have a lighter, less doughy texture. I use about 50-60g flour (that’s about 2 ounces, or a bit less than half a cup of flour) to about 150g (about 1/3 pound, a bit more than 5 ounces) of cabbage per one okonomiyaki. Basically, that’s enough cabbage to create a 1 inch high 10 inch disc shape on its own.
Mix the flour with a dash of salt and half a teaspoon of baking powder. You want to mix about 60-70ml dashi (or water mixed with dashi stock) taking precautions not to over mix it.
And now, the cabbage.
Here’s the important part: DON’T mince the cabbage. Cut the cabbage into strips, from pole to pole (lengthwise, not sideways. I hope this makes some sense. If the cabbage was earth, you cut from north to south, not the way parallel to the equator). Cutting into strips will create an intricate network of cabbage that supports the structural integrity of the okonomiyaki, even with the small amount of flour that we are using for this recipe.
Throw the cabbage into the batter, crack an egg on top, and mix until everything is distributed evenly. But don’t over mix.
Toppings:
In okonomiyaki, you can either mix the toppings into the batter or have the topping line one side of the okonomiyaki, cooking the ingredient into the surface of the okonomiyaki. Mixing in is popular with ingredients that are either not raw or are ready to consume without cooking, such as cheese or cubes of rice cakes. Cooking into one side of the okonomiyaki is more popular with ingredients such as pork belly and squid that develops a nice sear. I once made an okonomiyaki with hatch chilis lining one side, which created a charred, peppery crust to the okonomiyaki. As I said above, one of my favorites is okonomiyaki with cubes of dry mozzarella and bacon.
Sauce:
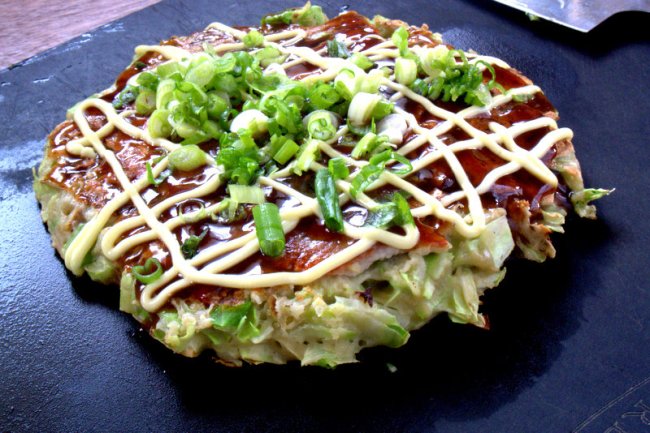
Throw anything you want on there. Of course, okonomiyaki sauce by Otafuku (the one with the creepy face on it) is the standard. My friend swears by a mix of “aurora” sauce, which is just ketchup mixed with an equal amount of mayo. I once slathered some wonderfully cumin-heavy BBQ sauce from Gates (my favorite sauce for KC style BBQ), which was pretty interesting. Another interesting method when you’re out of okonomiyaki sauce is to brush the top with some soy sauce and throw it under the broiler until the soy sauce sizzles. In this case, sprinkling some Shichimi chili peppers on the okonomiyaki is a good idea. Don’t forget to top the okonomiyaki with some bonito flakes, mayonnaise, and some sliced scallions, regardless of what sauce you throw on there.
The procedure:
Heat pan until lightly smoking, lower to medium heat, throw the cabbage batter on there, line the top with toppings, and wait 3 minutes.
Flip (and I guarantee the first try will be disastrous. Squish the broken pieces together until they resemble okonomiyaki, and you’ll be fine. The second flip is much easier) and leave for another 3-4 minutes.
Flip one last time, and sauce the whole thing while it’s on the pan. This will ensure that the okonomiyaki will stay warm.
Enjoy one last look of your beautiful okonomiyaki until you cut it, and make it into a mess.